Administrators can customize priority levels and status options to fit the business or department best. For example, you can create multiple priority levels (i.e. critical, medium, and low) to signify its importance and status (i.e. open, awaiting response, resolved) to indicate the progress toward a resolution. Users can track the progress of each Case by changing the Case status and priority level at various stages of processing the request.
Priority Levels
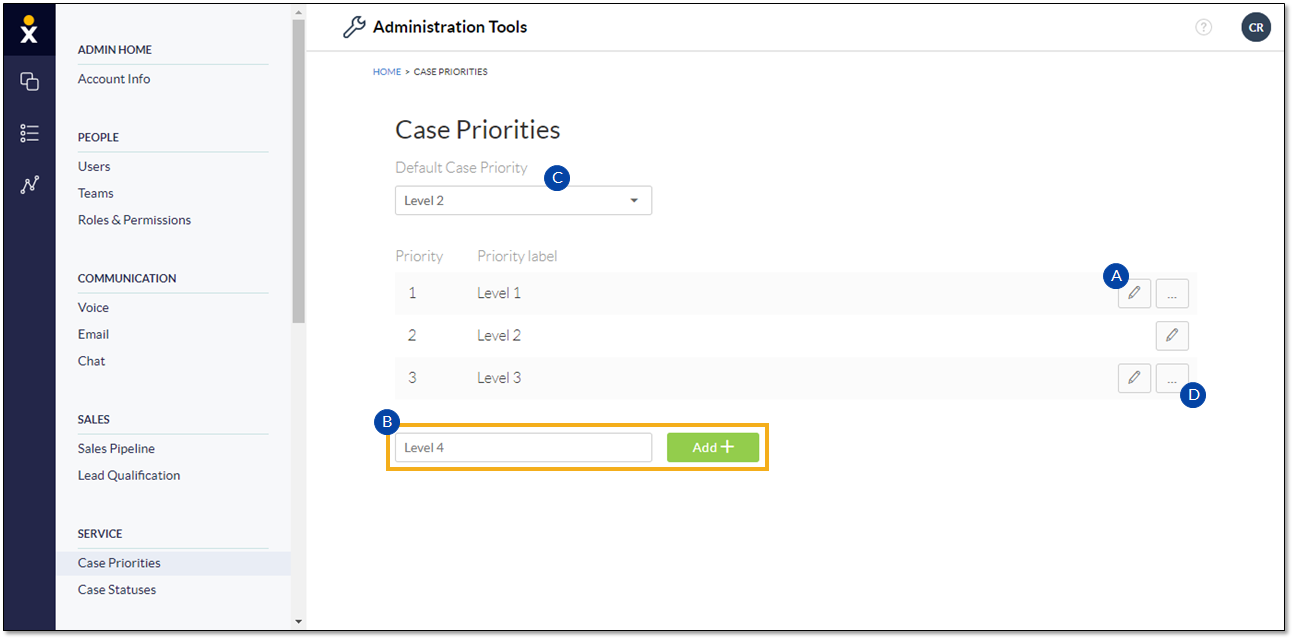
Customize the priority levels to be more meaningful for the business. By default, Nextiva CRM displays three priority levels (Level 1, Level 2, and Level 3). You can change the labels and add or remove priorities.
Adding a New Priority
- Visit nextiva.com, and click Login to log in to NextOS.
- From the NextOS Home Page, select CRM.
- Click the Administration Tools (wrench) icon at the top-right corner of the Nextiva CRM window.
- Under Service in the left navigation panel, select Case Priorities and perform the following actions:
- Change the priority label by clicking the pencil icon and editing the name in the Priority label text box. Click the green checkmark to save the changes or the red X to cancel.
- To add another priority level, click the text box and enter a name for the priority label, then click the Add +
- Select a priority from the drop-down list to make it the default Case priority. Newly created Cases will automatically display this priority label.
- Delete a Case priority by clicking the corresponding ellipses (…) Click Delete Priority to confirm.

Case Priorities
Case Statuses
Customize the Case statuses in a way that makes the most sense for each department. By default, Nextiva CRM displays five status options (Open, In Progress, Awaiting Response, Resolved, and Closed). Modify the default statuses by creating sub-statuses.
Adding a New Status
- Visit nextiva.com, and click Login to log in to NextOS.
- From the NextOS Home Page, select CRM.
- Click the Administration Tools (wrench) icon at the top-right corner of the Nextiva CRM window.
- Under Service in the left navigation panel, select Case Statuses and make the changes.
- Select the row corresponding to the department whose status you want to modify and perform the following actions:
- Create a new sub-status by selecting the Status Category and entering the new sub-status name. Click Add + The new sub-status will appear under the status category.
- Modify a sub-status by clicking the edit(pencil) icon. Click the green checkmark button to save. Click the red X button to cancel.
- Delete a sub-status by clicking the ellipses (…) icon > Delete Sub–Status.

Manage Status
