Administrators handle user management in Nextiva Contact Center. Different users have distinct roles, interactions with objects, and permissions within the system. The three primary roles in Nextiva Contact Center are Agents, Supervisors, and Administrators.
- Agents: Agents interact directly with customers and other users via various workitems such as Chat, Email, Phone, and SMS. They can be assigned to specific campaigns and queues, assisting customers with any inquiries or issues.
- Supervisors: Supervisors oversee agents, manage queues, outbound lists, and workitems. They can monitor workitems in real time, assist agents on live workitems, and generate dashboards and reports for performance tracking.
- Administrators: Administrators have the authority to create users, campaigns, queues, recordings, voicemail, and several other system settings.
Creating Users
Search for the User icon in the Options Menu. Click Plus (+) to the right of the Search field. Enter the required information under each tab.
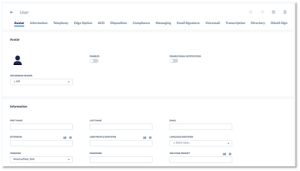
Avatar Tab
The uploaded photo will be visible to other users in the company directory and the list of users. To upload a photo (less than 100KB), click the default Avatar and select the image.
|
Toggle Button |
Description |
|
Enabled |
If enabled, the user can log in to Nextiva Contact Center. |
|
Disable Email Notification |
By default, an email will be sent once a user is created to create a password. If disabled, the email will not be sent. |
Information Tab
Enter the user details under the information tab, including the option to reset the user’s password.
|
Field Name |
Description |
|
First Name |
The first name of the user. |
|
Last Name |
The last name of the user. |
|
|
A valid email address for the user. The email address must be valid, as this address will be used to send the user a link for the creation process. The email address will also be used to send the user voicemails. |
|
Extension |
The user’s phone extension. This is important if your call flow will allow callers to enter an extension number to reach a particular user. |
|
User Profile Identifier |
Assign the user a profile (Administrator, Agent, Supervisor). The profile determines the user’s access. You can only select one profile for each user. |
|
Language Identifier |
The user’s preferred language (English, French, Portuguese, or Spanish). |
|
Time zone |
The user’s time zone. |
|
Password |
Create the password for the user to log in to the system. NOTE: An email is sent to the user to create a password, but a supervisor can use this field to overwrite that password. |
|
Welcome Prompt |
The welcome prompt is played to the agent when the user logs in. The prompt can be uploaded here manually or in the user profile. |
Telephony Tab
The Telephony tab is where to configure how the system will communicate with the user.
|
Field Name |
Description |
|
Use Endpoint |
If enabled and set up to use an endpoint, there will be a pop-up to select the phone device attached to their work area. |
|
Phone Type |
Where you configure the phone type (PSTN, SIP, and WebRTC), the user will use when making or receiving calls. |
|
Number |
Your PSTN phone number so that the system knows where to reach you.
NOTE: Users can use multiple devices, one being their PSTN. |
|
Work Offhook |
If enabled, the system will call you once and keep you active throughout the day. Available for SIP, WebRTC, and PSTN phone types. This is useful for predictive, so the user doesn’t need to be called repeatedly. |
|
Confirm Dial |
If enabled, Nextiva displays a “Confirm Dialing” pop-up with the phone number. Click inside the box to dial and click outside to cancel. |
|
Twilio Edge ID |
Allows you to choose the closest Twilio node to you from the drop-down list. |
Edge Option Tab
|
Field Name |
Description |
|
Twilio Edge ID |
For calls that do not go through Twilio, selecting a specific Edge closest to the agent’s physical location will improve the quality of their calls. On Twilio, it is detected automatically. |
|
Region |
The region assigned to the agent (if applicable). |
ACD Tab
The ACD (Automatic Call Distributor) is an automatic workitem distributor offering workitems to agents.
|
Field Name/Toggle Button |
Description |
|
Allow ACD Changes |
If users can change their ACD settings, they can enable or disable Auto Accept Workitem, Auto Login to ACD, and ACD Login Status. The user can also decide which queues to log into and which channels to log into. By default, Allow ACD Changes is disabled. |
|
Auto Accept Workitem |
If enabled, the user will no longer be required to accept ACD workitems. As soon as the work item is offered, the workitem will become active. A user working OffHook and has auto-accept enabled will connect to each subsequent call without having to accept or pick up the phone. |
|
Auto Login to ACD |
If enabled, this user will be automatically logged into the ACD every time they log in to Nextiva Contact Center. If Auto Login To ACD is not enabled, the user must take the extra step to log in to the ACD and select a queue, channels, and status. |
|
ACD Login Status |
This allows you to choose the status of this user when they first log in to the ACD. For example, if you want the user to start receiving workitems immediately, you would select an available status. |
|
Ring Phone on ACD Offer |
If enabled, users with this profile’s phone will ring when receiving ACD offers. |
Disposition Tab
At the end of every workitem, a user can choose a disposition. The dispositions can be assigned by campaign and by workitem type. Dispositions allow the user to classify the workitem.
|
Field Name |
Description |
|
Disable Disposition |
If enabled, the system will auto disposition every workitem. |
|
Auto Disposition |
Disposition workitems automatically from an agent’s screen when they are in wrap-up for an amount of time established in the “Wait time before Auto Disposition” option below. |
|
Wait Time before Auto disposition |
The time to wait before a terminated workitem is auto dispositioned. |
|
Enable Disposition Notification |
The pop-up warning notifies them they haven’t dispositioned a workitem. |
|
Delay Notification after |
How long to wait before providing the Disposition Notification. |
Screen Recording Tab
If enabled, when an agent is on a call, and the call is being recorded, Nextiva will record the agent’s screen and keep a video recording of what was happening on the agent’s screen during the call.
Compliance Tab
The Compliance tab ensures compliance with company policy, tenant consent, and call hours.
|
Toggle Button |
Description |
|
Legal Hours |
If enabled, every time this user attempts to make an outbound call, the system will verify if the area code is being dialed within the list of hours allowed to be called. |
|
Tenant Consent |
If enabled, the system will verify if the phone number exists in the local consent database. The system will warn the user if the consent type is set to DNC, Opt-out, or reassigned. |
|
Verify Consent on SMS |
If enabled, the phone number receiving the SMS must be explicitly created in the Consent table with opt-in or opt-in SMS. If Verify Consent on SMS is disabled, the SMS will be sent without verifying against the consent table. |
|
Disable Start Recording |
If enabled, the user cannot start recording a call. |
|
Disable Stop Recording |
If enabled, the user cannot stop recording a call. |
Messaging Tab
Set up a pseudonym and custom message that will be displayed to customers via chat.
|
Field Name |
Description |
|
Psuedonym |
A fictitious name will be displayed to customers when they chat with this user. The system will display the user’s first name if no pseudonym is entered. |
|
Chat Welcome Message |
A message will be displayed to customers when this user accepts a new chat. |
Shelf AI Agent Assist Tab
If you have an integration with Shelf AI, you need to have the ID of the user in the configuration that is using Shelf AI. If you have live transcription enabled, it gets passed to Shelf AI, which can pass recommendations on how to respond to the user. This can be done with any workitem with live transcription enabled.
Email Signature Tab
Add a signature that will automatically be added to outbound email workitems.
Voicemail Tab
|
Field Name |
Description |
|
Voicemail Greeting |
You can listen to the user’s voicemail greeting by selecting the Speaker icon. Click the ellipses to upload a voicemail greeting for this user. |
|
Voicemail Drop |
The default voicemail message. |
|
Default Disposition On Voicemail |
The disposition is used when a customer reaches the agent’s voicemail. |
Transcription Tab
|
Field Name |
Description |
|
Enable Realtime Transcription |
Integration with third-party services like Deepgram and Google Generative AI can be enabled or disabled from here. |
|
Percentage of the maximum minutes |
Percentage of transcription minutes assigned to this user from the total tenant minutes. |
Directory Tab
Choose to hide the user from the Auto Attendant so customers cannot find their direct line via IVR. You can also hide the user from the company directory, so they are not visible to other users on the account.
OAuth Sign-In Tab
OAuth allows Nextiva to grab roles and queues from an external system following the OAuth protocol.
|
Field Name/Toggle Button |
Description |
|
Profile Assignment From External Role |
The fieldname in the external system where the role of the user is found. |
|
Queues Assignments |
The fieldname in the external system where the list of queues the user is assigned to is found. |
Tracing Tab
Enable logging for troubleshooting purposes.
|
Toggle Button |
Description |
|
Enable Client Side Logging |
If enabled, the browser will display more data in the JavaScript console. |
|
Enable Server Side Logging |
The server logs will capture more data about this user’s transactions if enabled. |
Home Tabs Tab
Assign home tabs for the user to access quickly. Click Plus (+) and select the home tabs to assign. Click OK.
Queues Tab
Assign the user to queues by clicking Plus (+) and selecting the queues to assign. Click OK.
Skills Tab
Assign skills to the user by clicking Plus (+) and selecting the skills to assign. Click OK.
Supervised Queues Tab
Select queues that a user will supervise by clicking Plus (+) and selecting the queues to manage. Click OK.
Supervised Users in Queue Tab
To supervise all the users in a selected queue, click Plus (+) and select the queue. Click OK.
Supervised Users Tab
To select individual users for the user to supervise, click Plus (+) and select the users. Click OK.
Supervisors Tab
The Supervisor’s tab is a list of users that are supervising a user. Click Plus (+) and select the users you want to supervise the user. Click OK.
Supervised Campaigns Tab
The Supervised Campaigns tab allows you to select campaigns for a user to supervise. Click Plus (+) and choose the campaigns. Click OK.